Send data from your SOTI Snap apps to an external
destination. Each data export connection is specific to a single app. You can send
data to any of the following destinations:
Data Export
Destination
Email
A list of email addresses.
FTP/SFTP
A location in an FTP or SFTP server.
Gmail
A list of Gmail addresses.
Google Drive
A Google Drive folder.
OneDrive
A Microsoft OneDrive folder.
SharePoint
A location in a Microsoft SharePoint server.
SOTI Snap Link
The SOTI Snap Link, where you can configure
the data to relay to a SQL database or email server.
WebHook
A WebHook that relays it to other applications.
Zapier
A WebHook that relays it to Zapier.
Tip: You can watch instructional videos from the SOTI Snap interface to assist you in creating a new data
export connection (see Step 5 below).
After creating a data export connection, you can execute further operations on them
(see Managing Data Exports). To view
more information about an application's data exports, see Review Data Export Status.
Note: Check you have
access rights to the external tool you want to connect to SOTI Snap.
About this task
Send app data from a SOTI Snap
application to one of the following:
Email
Gmail
Google Drive (FTP/SFTP)
OneDrive
SharePoint
SOTI Snap Link
WebHook,
Zapier
Procedure
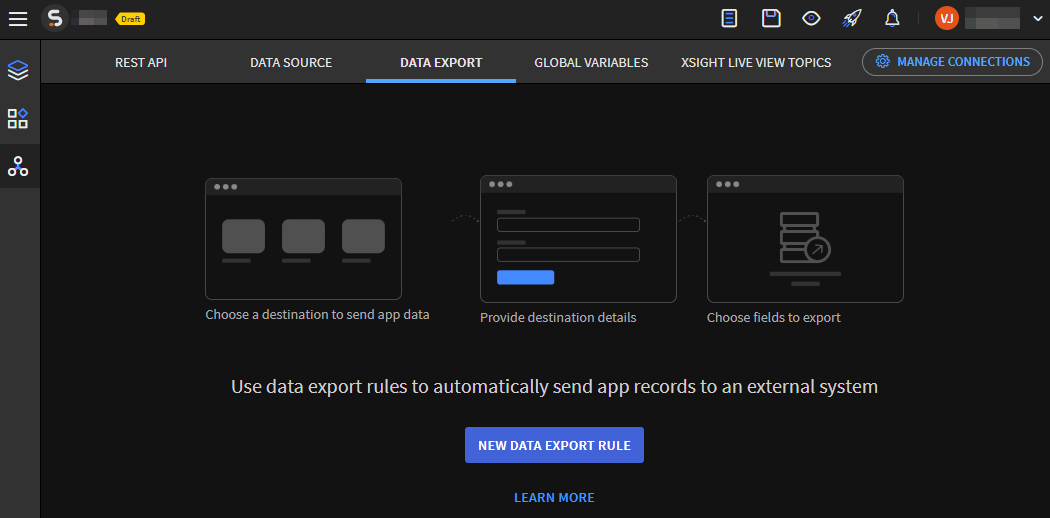
In the Canvas, navigate to the Data Connection
Rules view.
Select Data Export to navigate to the Export Rules tab.
Select
New Data Export Rule to launch the Create
Data Export wizard.
Enter a name for the rule and choose from the available connections, then
select Next.
Note: The name of each data connection must be unique to
the app.
Choose Play Demo to watch an instructional video on
exporting data for the selected Data Export. Select
Next, and follow the corresponding procedure:
Data Export
Procedure
Google Drive
Note: Your app must contain a form page to use a
Google Drive Export connection.
Select Create New to add a
Google account to SOTI Snap.
Enter a Google account name (not an email address)
and select Authenticate.
Another browser window opens where you can sign into
your Google account to verify your integration with
SOTI Snap.
Follow the Google sign-in prompts.
Tip: You can add more than one Google account to
SOTI Snap.
Choose an email account and select
Next.
Navigate to the folder and file you want to export
to SOTI Snap.
Tip: Use the search field to find the folder
you want.
Select the form from which you want to pull data in
your app.
Choose the fields you want to include in the
exported pdf file. Turn on Don't show empty fields in
PDF to hide fields that do not contain data. Select Next.
SOTI Snap Link
Use SOTI Snap Link data export to
send data from a SOTI Snap
app to an external destination such as an SQL Server
database.
Note: Your app must
contain a form page to use a SOTI Snap Link Data Export
connection.
Restriction: To complete a
SOTI Snap Link data export, you
must complete the following steps:
Choose the SOTI Snap Link
connection you just created and select
Next.
Select the app Form screen where you want to
pull data to send to the SOTI Snap Link.
Choose the app fields you want to include in the
data transfer. Only fields in the selected Form
screen appear. Select
Next.
SharePoint
Note: Your app must contain a form page to use a
SharePoint Data Export connection.
Select Create New to add a
Microsoft Office 365 account to SOTI Snap. Enter a Microsoft
account name (not an email address) and select
Authenticate. A browser
window opens to sign in to your Microsoft account
and verify your account for use with SOTI Snap.
Follow the Microsoft prompts to link your Microsoft
account with SOTI Snap.
Important: This third-party process
created and maintained by Microsoft is subject to
change.
Log into a Microsoft account to see a list of
the permissions required by SOTI Snap.
At the bottom of the approvals list, enter a
justification for your app's level of access and
select Request Approval.
Your Microsoft Azure account administrator
receives the justification and evaluates it. You
and the Microsoft Azure administrator receive an
automated notification email from Microsoft Azure
regarding the request. You can only proceed once
you receive an approval email from the
administrator.
Select a Microsoft account, then select
Next.
Navigate to the folder in SharePoint where you want
to put data exported from SOTI Snap.
Tip: You may only navigate to folders
for which you have the necessary permissions. Use
the search field to find the folder you want.
Select the form from which you want to pull data in
your app.
Choose the app fields in the selected form's page to
include in the exported *.pdf
file. Turn on Don't show empty fields in
PDF to hide fields that do not contain data. Select Next.
OneDrive
Note: Your app must contain a form page to use a
OneDrive Data Export connection.
Select Create New to add a
Microsoft Office 365 account to SOTI Snap. Enter a Microsoft
account name (not an email address) and select
Authenticate. A browser
window opens to sign in to your Microsoft account
and verify it for use with SOTI Snap.
Follow the Microsoft prompts to link your Microsoft account with SOTI Snap.
Important: This third-party process created and maintained by Microsoft is subject
to change.
Log into a Microsoft account. You see a list of the permissions
required by SOTI Snap.
At the bottom of the approvals list, enter a justification for your
app's level of access and select Request
Approval.
Your Microsoft Azure account administrator receives the justification and
evaluates it. You and the Microsoft Azure administrator receive an
automated notification email from Microsoft Azure regarding the request.
You can only proceed once you receive an approval email from the
administrator.
Select a Microsoft account, then select
Next.
Navigate to the folder in OneDrive where you want to
put data exported from SOTI Snap.
Tip: Use
the search field to find the folder you want.
Select the form from which you want to pull data in
your app.
Choose the fields to include in the exported
pdf file. Turn on Don't show empty fields in
PDF to hide fields that do not contain data. Select Next.
FTP/SFTP
Note: Your app must contain a form page to use
an FTP/SFTP Data Export connection.
Enter the following connection details for the FTP
or SFTP server.
FTP/SFTP Server
Address: Enter the full server address
for your FTP or SFTP server. For example,
ftp://website.com or
sftp://website.com.
Port Number: By
default, SOTI Snap sets
the port number for FTP servers to
21 and SFTP servers to
22. Change this value if your
server's port number differs.
Username: Enter the
username for an account with read access to the
server.
Password: Enter the
password for that account.
FTP/SFTP Location:
Enter a location within the FTP or SFTP server
where you want to place the exported data. If you
do not specify a location, the exported data is in
the server's default public folder.
Select Test to validate the
connection and check the server details are correct,
then select Next.
Select the app's Form page from which you want to
pull data.
Choose which app fields in the selected form page
you want to include in the exported
pdf file. Turn on Don't show empty fields in
PDF to hide fields that do not contain data. Select Next.
WebHook
The WebHook Data Export delivers data to other
applications through an HTTP POST request. The request
body holds the data sent to your HTTP endpoint in JSON
format.
Enter the WebHook URL and select
Authenticate. Select
Export and delete to delete
app records from the SOTI Snap server and devices
once pushed to the WebHook server.
Choose the data fields to send to the WebHook
server.
Select fields from the App
fields panel and move them to the
Fields to send panel, then
select Next.
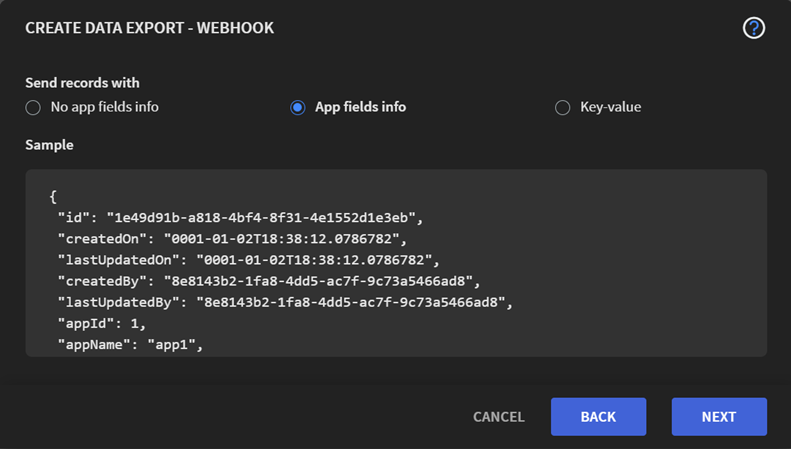
Choose the format for sending the app data to
WebHook.
Select No app fields
info if the service behind WebHook is
aware of the app fields.
Select App fields info
if the service behind WebHook is unaware of the
app fields.
Select Key-value if the
service expects data in key-value pairs like
Zapier.
Gmail
Note: Your app must contain a form page to use a
Gmail Data Export connection.
Select Create New to add a
Google account to SOTI Snap. Enter a Google account name (not the email
address) and select
Authenticate. A browser
opens to sign in to your Google account and verify
your email account for use with SOTI Snap.
Follow the Google sign-in prompts and enable Google
to grant SOTI Snap any
requested permissions. The Google account browser
window closes after you grant all SOTI Snap permissions.
Tip: You can add more than one Google
account to SOTI Snap.
Choose the account you just created, then select
Next.
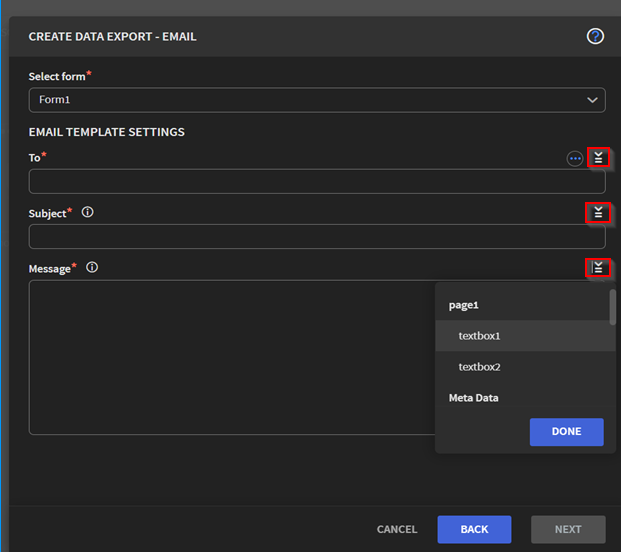
Select a form from your app and fill in the
Email Template Settings
fields.
To: Enter at least one
email address. Use macros to dynamically populate
the recipient's field based on the app's
contents.
Subject: Enter a
subject line for the email message. Use macros and
metadata to dynamically populate the subject line
from the app's contents.
Message: Enter text for
the body of the email message. Use macros and
metadata to populate the subject line dynamically
from the app's contents.
Email
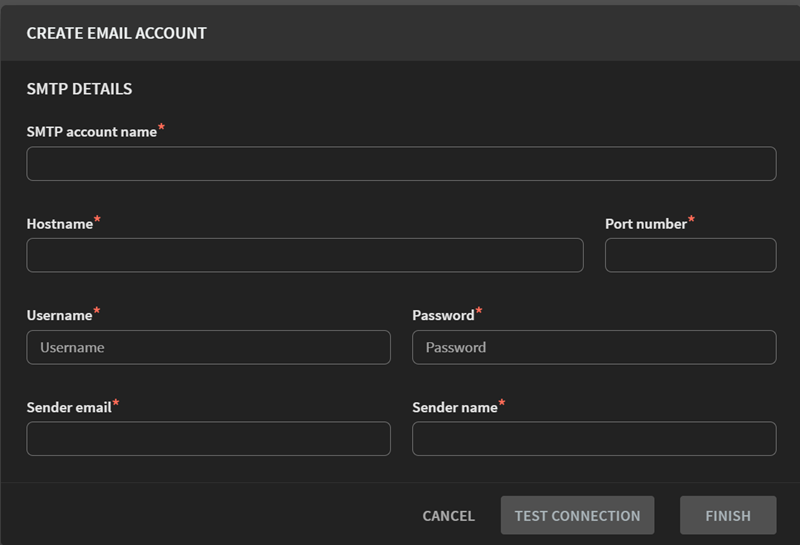
Select Create New to add a
SMTP account. Fill in the following fields of the
Create SMTP Account dialog box.
SMTP Account Name:
Enter the SMTP account name.
Hostname: Enter the
hostname of the SMTP server.
Port Number: Enter the
port number of the SMTP server.
Username: Enter the
username of an account with access to the
server.
Password: Enter the
password.
Security Protocol:
Choose the encryption protocol expected by the
STMP server.
Sender Email: Enter the
email address to send emails containing data
exported from SOTI Snap.
Sender Name: Enter the
name you want to appear as the sender in the
recipient's inbox.
Select Test to verify the
SMTP server details. A successful connection returns you to the
Create Data Export - Email
dialog box.
Choose the new account and select
Next to create an email
template.
An email template includes a defined
email address, subject, and body. Use
Merge tags to introduce
dynamic content to the email template. Merge tags
link data collected from a SOTI Snap app to a unique
identifier you can embed in the email template.
Data stored in the corresponding app field
replaces the merge tags.
You can use merge
tags in the To,
Subject, and
Message fields.
Zapier
Enter the Zapier WebHook URL.
Note: To get a Zapier WebHook URL,
navigate to https://zapier.com/ and create a zap with the Webhooks
by Zapier trigger app.
Optional: Rename the mapping keys, if
necessary.
Each app field has a unique key to
send app data in Zapier to configure zap.
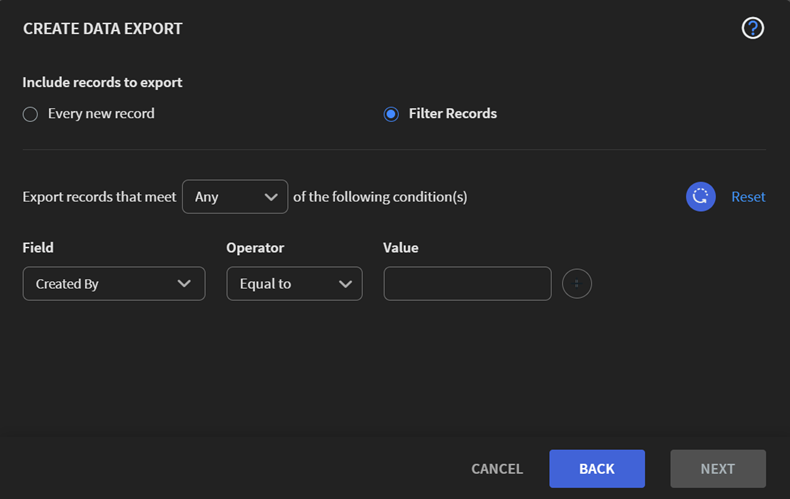
Decide on the app data to export to this destination.
All records to export all app data.
Filter records to create filters and export only
a subset of data from the app.
For the file export to occur, specify if the record must meet
all or any of the
specified conditions.
Select the field where you want to apply the condition. Use the
Operator and Value
fields to set your conditions.
Select
Add to add more conditions.
When satisfied with all your conditions, select
Next.
Note: The option to filter export data is not
available when working with Business apps. Users wishing to export
filtered data can use Condition activities within the workflow
instead.
Review the data connection settings for accuracy. Select
Finish to save your data connection or
Back to return to an earlier screen and make
edits.
Results
The created export rule becomes available in your app
project.
Note: All active connections are automatically
triggered when configuring data export rules for standard apps. You can not preview
this feature.