Editing Incident Details
Before you begin
Users with all SOTI XSight roles can edit incidents. However, some options and controls described here might not be available to the reporter role, depending on the system configuration.
About this task
How to edit an incident
Procedure
- From the Incident Management dashboard, find the incident that you want to edit. To learn how to find incidents, see Finding Incidents.
- Open the incident and enter the details in the fields provided.
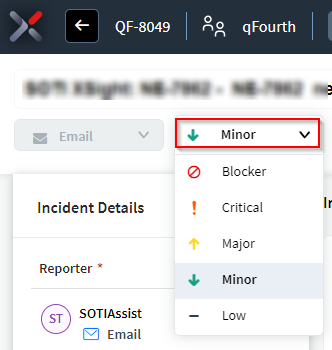
Set a priority level
About this task
Procedure
- Open the incident.
-
Select a priority for the incident from the Priority
list at the top of the incident's page.
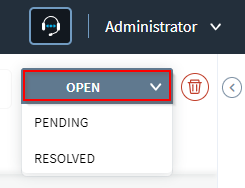
Change the status
About this task
Procedure
- Open the incident.
-
Select the incident status from the Status list at
the top of the view.
Add tags
About this task
Tags can help you categorize and search for incidents. Tags can be:
Predefined: created by SOTI XSight administrators.
User-defined : created by any user.
Depending on your system, user-defined tags might not be available. To learn how to enable user-defined tags, see Tags Settings.
Procedure
- Open the incident.
- Select the + Add a Tag button to display the tags dropdown list.
-
Enter one or more tags in the Add a Tag field. Use
the search bar at the top of the dropdown list to find a tag.
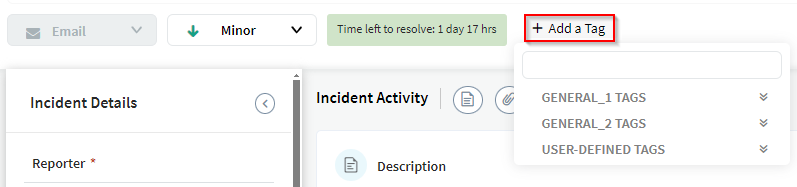 Added tags appear to the left of the Add a Tag button.Note: Use the search bar at the top of the + Add a Tag dropdown list to find tags.
Change the reporter
About this task
Procedure
- Open the incident.
-
In the Reporter section in the Incident Details
panel, select the Add button, and
then select one of the following:
- If the incident reporter is someone who was previously added as a reporter, start typing the person's name in the Search for Reporter field. When you find the reporter's name in the list, select it.
- If the incident reporter is someone new, select New Reporter, enter the reporter's information in the Add New Reporter dialog box, then select the Save button.
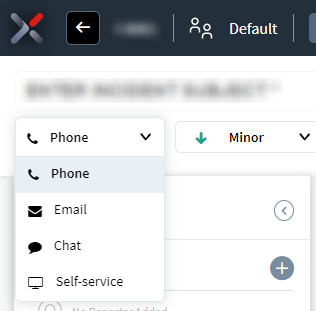
Set the source method
About this task
Procedure
- Open the incident.
-
Select the method used to report the incident from the Reported
Method list at the top of the incident page.
Specify an affected device
Procedure
- Open the incident.
-
In the Devices section in the Device Details panel,
select the Add button , and select
one of the following options:
- To add a device that is currently managed by the associated instance of SOTI MobiControl, start entering the device name in the Search for Device field. Select the correct device when it appears in the list. If you associated additional SOTI MobiControl instances to SOTI XSight, you can also select which instance of SOTI MobiControl you want to search. By default, SOTI XSight searches all associated SOTI MobiControl instances.
- To add a device that is not managed by the associated instance of SOTI MobiControl, select Add Unmanaged Device and enter the device identifier.
- If the device is managed by SOTI MobiControl v14 or higher, you can select the device to open the Device Information panel in the SOTI MobiControl console.
Link related incidents
Procedure
- Open the incident.
- To link related incidents:
- After you have selected an incident, you can specify how the incident is related by selecting a link type (for example, Related) from the drop-down list.
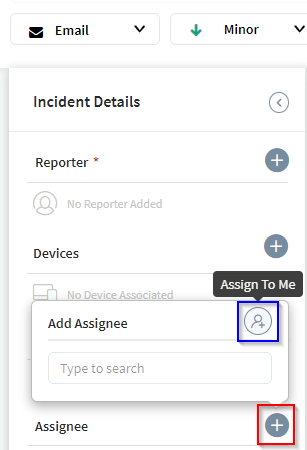
Assign employees
Procedure
- Open the incident.
-
In the Assignee section on the left side of the
view, select the Add icon, and
search for the user.
To assign the incident to yourself, select the Assign to Me button on the right of the Add Assignee dialog. box.
 Note: LDAP users do not appear in the search results until after they've logged into the associated SOTI MobiControl instance at least once.
Add watchers
About this task
Watchers receive an email notification when an incident is updated. By default, the incident reporter and the incident assignee are added to the list of incident watchers. You can add and remove watchers to an incident at any time.
Watchers can also add others to the watch list by replying to a notification email and including the emails of the new watchers in their reply. Watchers can also remove themselves from an incident at any time by selecting the Unsubscribe link in a notification email.
To add a watcher:
Procedure
- Open the incident.
-
In the Watchers section of the Incident Details
panel, select the
 button and search for the user.
To \yourself as a watcher, select the Add Me to Watchers button on the right of the Add Watchers dialog.
button and search for the user.
To \yourself as a watcher, select the Add Me to Watchers button on the right of the Add Watchers dialog.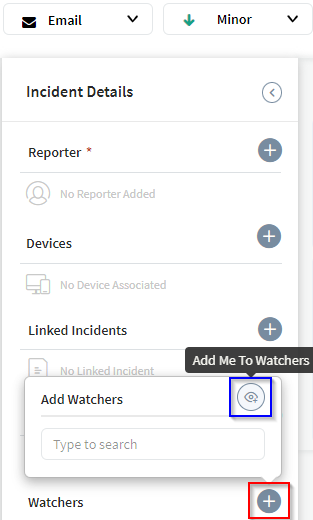
Attach files
Procedure
- Open the incident.
- To attach a file to the incident, select Add Attachment. A file explorer dialog box opens.
- Select the file you want to attach and, after attaching it, add a description or remove it. Files attached to an incident can be downloaded and viewed in the local system's default application for that file type.
Email copies
Procedure
- Open the incident.
- To send an email, select Send Email.
- Fill out the fields provided. By default, watchers are added to the CC email field. You can remove the watchers or add additional email addresses.
- Optional. Specify the color and style of the email text, set the background color, or insert an inline image.
- Optional. To attach a file to the email, select the Attach button. You can attach a file that was previously attached to the incident, or you can select Browse to select a file on your local file system.
Add descriptions
Procedure
- Open the incident.
- In the Description field, enter a description of the incident.
Add notes
Procedure
- Open the incident.
-
To add a note to the incident, select the Add
Note button.
Note: To make the note private, select Keep note private. Incident reporters cannot read private notes and they are not notified when added to an incident.
- When you have finished typing the note, select the Add button.
Add resolution notes
About this task
Procedure
- Open the Incident.
- Submit the incident as resolved by selecting Submit As Resolved.
- The Resolution Notes options appears. Enter your notes in this text box.
- Optional: To hide the note from everyone but the reporter and administrators, toggle the Keep note private option.
- Select Update.