|
|
Geofence Event |
A Geofence Event is an alert trigger based on a GPS enabled device entering or
leaving a Geofenced area defined by you. In order to create a Geofence
event, you need to create an Alert Rule with a Type of Geofence Event.
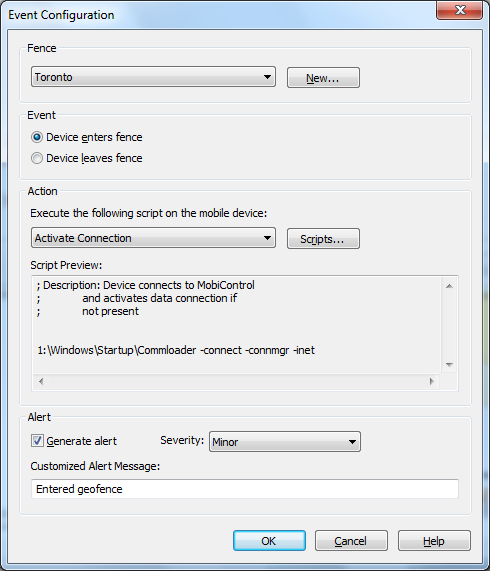
The Fence section allows you to create a geofence by clicking on the New button in the dialog box.
The Event section allows you to configure whether this event should be triggered on entry or exit of a fence.
The Action section allows you to configure what script you want to run on the mobile device when the event is triggered. This is optional, but you have for example the ability to run an Activate Connection, Log Event, Show Message or even wipe the device completely.
The Alert section allows you the option to Generate an alert, configuring
its Severity (Minor, Serious and Critical) and add a Customized Alert Message,
such as "Entered geofence".
When you click on the New button in the Fence section, the
following Geofence Creation dialog box appears:
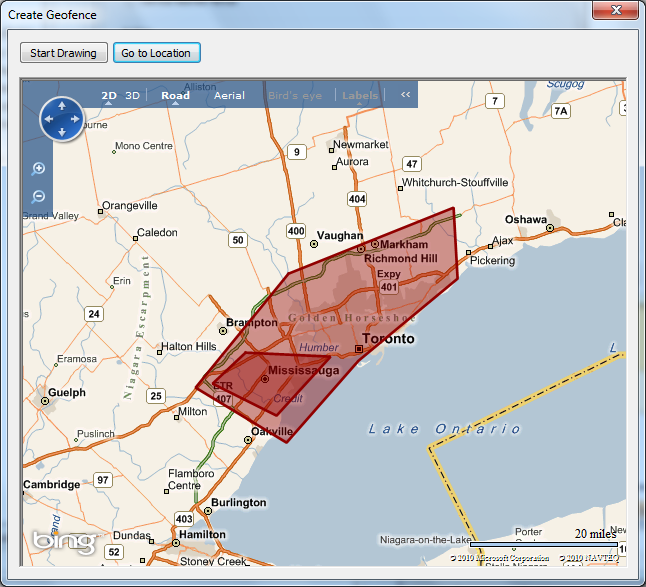
The two options available are to Start Drawing and Go to Location.
The Start Drawing option allows you to begin drawing on the map below the
button. The area drawn on the map will be defined as the Geofence. The defined area must be a complete geometric shape, which means the Start Drawing point will be the same as the End Drawing point. When you have completed a proper geometric shape you be asked to name your geofenced area.

Prior to selecting the Start Drawing button, you have the ability to use the view control buttons in the map in order to move to a desired location, zoom in and out, switch to 3D, Road, Aerial and Bird's eye views among the many options. This allows you ease to create an appropriate view for your geofence.
Alternatively to identify the appropriate view of the map, you can click on Go to Location which will allow you to specify a street address, location, landmark, or an existing geofence.
![]() Example:
Example:
-
350 Fifth Avenue, New York City
- Rome
- SFO (San Francisco International Airport)
Once you have the appropriate view displayed, you can click on Start Drawing and
you are now able to create a fence. The first click of the mouse is first
point of the fence. In order to complete the fence, you must have at least
3 distinct points selected on the map. In order to complete your fence, the last
point must end off at the first point so it completes the closure of the fence.
Once the last point is selected, a pop-up requesting the name of the geofence is
shown. Here you should enter a meaningful name for that specific geofence
in case you would like to use it again.
Select Geofence
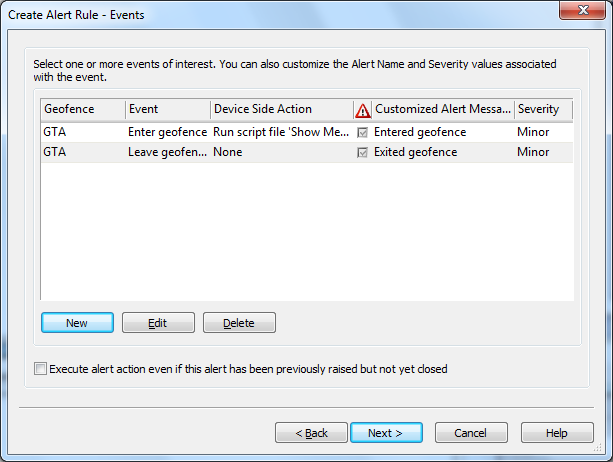
Once the event is configured it will display as shown in the above diagram.
Here you have the ability to create new events, edit existing events or delete
events. Also, on this dialog box, there is a checkbox at the bottom
allowing you to determine whether or not you want to Execute alert action even if this
alert has been previously raised but not yet closed.
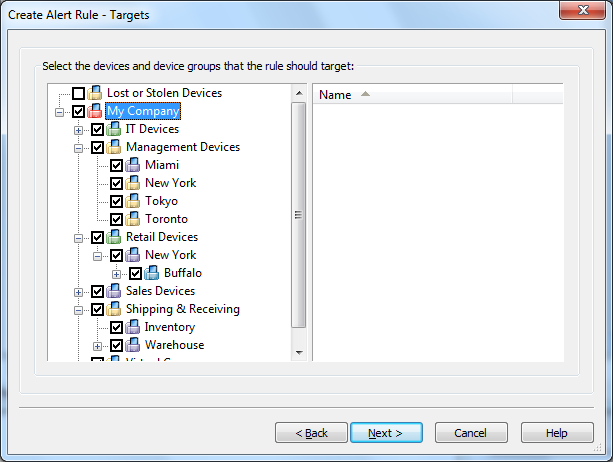
Select Devices
Select the devices to which the rule will be applied. Apply the rule to all devices in your device tree or simply individual group(s) and/or device(s). Once you have completed this section, click the Next button.
Select Power Policy
Clicking Next moves you to the Power Policy section as seen below.
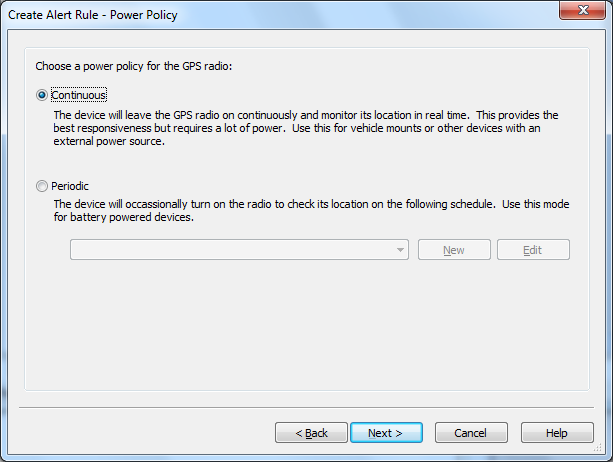
The options available for the Power Policy are Continuous and Periodic.
Continuous indicates the GPS radio is always on and the location will be monitored in real time. It is best to use this option with devices that have an external power source or are vehicle mounted because this option takes up a lot more power.
Periodic will turn on the radio based on a schedule that you define. Based on your business requirements, this can be as responsive as every 2 minutes, or every weekday all the way up to every year. It is best to use this option when you have battery powered devices in order to minimize the amount of power consumed with having this feature on.
After selecting your power policy, click Next and continue the Alert Rule Wizard here.